Category Archives: Open Source

Expresso Book Machine

Teleread has an article about the Expresso Book Machine here

Everyone knows I love my kindle but before the kindle I loved books. I mean LOVE books – I still have a set of three bookshelves in my office that are overflowing and books stashed in various places around the house. Our bedroom has a set of bookshelves that frames our window (built by my creative husband) that is just for paperbacks we read for fun.

I love the idea of print on demand books and I can see it going a step further. In a generation of re-mix why not create your own book? You can already create your own reference “book” from Wikipedia. I have an article on how to do that here .

I can envision taking all the snippets and articles that I clip and bookmark around the web put together in a way that makes sense to me and plugging in my jump drive or SD card to one of these “self-print” book machines and printing out a book I can place on my shelf or carry with me to read later. You can already do this with your ereader by creating a pdf of them and then dragging the document to your kindle.

Then go a step further. Ala Carte Text books. Will we see a day when instead of just the ubiquitous copy machine that resides in school offices and teacher work rooms, a machine that allows teachers to print out copies of text books tailored to specific classes or units?

One of the sessions I attended at TCEA was on Opensource Education or just open education if you will. MIT Opencourseware is a website with over 2000 courses online and free for the self directed learner. Combine this kind of thinking with the ability to print your own text book and you see an interesting future.

Another Reason To Love Wikipedia

Today as I was researching on Wikipedia, I was preparing to click on the print menu on the side and create a pdf of the page to load on my kindle.  When you click on the little arrow next to print you get a list of tools.  You can create a book, download page as a pdf, or get a printable version. Wait a minute.  Create a book?  Why have I not noticed this before?

When you click create a book you will see this:
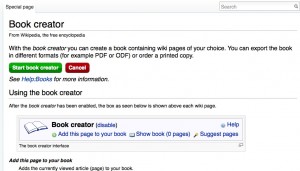
Add this page to your book
Adds the currently viewed article (page) to your book.
Show book
Opens a new page which will show a list of all articles (pages) that you added to your book. On that page, you can change the order of the articles in your book and structure them using chapters. Further, you can download the books as a PDF or ODF, or order a printed book.
Suggest pages
This tool analyzes the current set of pages in your book and suggests articles that might be also relevant to the overall topic of your book. This tool allows to create books quickly.
Disable
This will disable the Book creator and delete your book (unless you saved it first).
Adding pages without visiting them
A quick way to add pages is to simply hover on a linked article. If you wait about one second, a small box will pop up with the message “Add linked wiki page to your book”. Click on this link, and the linked article will be added to your book.

Hovering your mouse over links is a convenient way to add pages to your book
Adding whole categories
If you are viewing a category page, you can add all the pages in that category at once. The Add this page to your book link will have changed into Add this category to your book. Click on this new link, and all the articles in that category will be added to your book. Relevant categories may be found at the very bottom of Wikipedia articles. Categories can also be added by hovering category links.

Each successive page will now have this handy link at the top:

When you have completed adding pages to your book, you can download the entire thing as a pdf.  Very nice for my Kindle 🙂
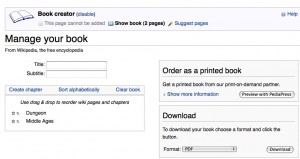
Click Show Book and the following page pops up.  You can tweak your title, sort your pages, preview, order a printed copy if you like, or simply download your book. Then if you are me, you convert it for your Kindle and read at your convenience.
Caveat: I do not advocate the use of Wikipedia at school as teachers have very strong feelings about the website.  I suppose the fact that even I can edit the site could be cause for concern but there are people constantly checking and fixing errors and misinformation.  Try looking up Hurricane Katrina in the set of Funk and Wagnalls I bought when my son was born.

Because Wikipedia is a massive live collaboration, it differs from a paper-based reference source in important ways. In particular, older articles tend to be more comprehensive and balanced, while newer articles more frequently contain significant misinformation, unencyclopedic content, or vandalism. Users need to be aware of this to obtain valid information and avoid misinformation that has been recently added and not yet removed (see Researching with Wikipedia for more details). However, unlike a paper reference source, Wikipedia is continually updated, with the creation or updating of articles on historic events within hours, minutes, or even seconds, rather than months or years for printed encyclopedias.

You should always check more than one website when you are doing research, but Wikipedia is a great place to start.

TCEA 2010 Gimping It Up

gimp
beth phinny
big spring high school
leslie ferris
lubbock cooper high school

GNU image manipulation program

up to version 2.6

www.gimp.org

alien project
picture of person
select what part (face)
click on rectangular select
draw square around upper body
crop to selection
that gets rid of excess
distort Iwarp
opens a window
grow option
deform radius – choose between 25-35 kind of play with it
click on forehead and kind of click out to pull it out bigger
if you don’t like it you can click reset
when ready – click okay
filter distort iwarp again
grow the eyes – little horizontal lines slowly
shrink chin same process only shrink instead of grow
to colorize
click on color, colorize choose numbers to get hue and saturation

selective colorization
6 steps
layer
duplicate layer
click on background copy
make it b and w – desaturate sure whatever
turn off eyeball on background copy
click on erasure get size you can work with – brackets change size
erase the black and white part you want to end up in color

warp
new image
choose size
click ok
foreground and background color
fill
click on paintbrush tool
click on top, hold down shift, drag it down and click on bottom and it will create a straight line
make ten of these across the image (vertical lines)
use filter – distort, polar coordinates
make sure that checkmark is on 2 polar
gaussian blur

links
gimpology.com
gimptalk.com
tutorialized.com
gimpusers.com/tutorials.php

TxTechnoGeeksRUs.com

Dare to Use Audacity TCEA Session 2 Notes

http://sites.google.com/site/daretouseaudacity/
Resources and Links all on their google site Yay!
Audacity is opensource – free – links are on their google page for downloading
Make sure you download the lame encoder so you can export as mp3s

Classroom uses (they showed several examples)
Book talks
Substitute Instructions
Speech Pathology
Create Interviews (you can do it yourself and use audacity to change one voice so it sounds like two people – historical character. book character etc)
(files can be brought into movie maker and powerpoint
record reading a textbook for student
record students reading aloud so they can hear themselves
audio book reports
book promo for library

Headphones with mics attached helped to record without picking up background noise

Sound resource freeplaymusic

demonstrated creating three tracks – two had the music and stepped down and then back up and the “speaking” track was placed so that it fell between the steps so you had music introducing, then speech, then music for the ending
Can edit out words (uh, and like)

Can add words

Audacity saves the file as a .au (this is where all the behind the scene stuff happens – do not touch this file and you can edit it later)

When complete you have to export as an mp3 or wav file

resulting mp3 can be used as background audio, podcast, embedded in a blog, imported into powerpoint or moviemaker

Ubuntu!

I finally did something I have been wanting to do for some time.  A friend brought me his old computer that was no longer working correctly.  It was extremely slow to respond and he had lost the Windows disk so he couldn’t re-install.

Last night I downloaded Ubuntu  and burned it to a cd.  This afternoon I hooked his old computer up to my monitor, turned it on, and put the cd in the cd drive.  All it took was one click and it started loading the files it would need.  When it was done it gave the message to remove the cd and reboot.

When I rebooted it gave me the choice to boot into Windows or Ubuntu and that was all there was to it.

It gave me the choice when I was first installing to install Ubuntu with Windows or remove Windows completely.  This time I was kind of a chicken but next time I think I will just throw Windows off a cliff.

My kids still have a few issues with Ubuntu and things like flash and I haven’t had time to see if things will work better on thsi version than on the older version that is on the old laptop.  I have literally been up and running in Ubuntu for about ten minutes! The only issue I have so far has to do with screen resolution and I will try to get that resolved later.  I’m just tickled that it worked and was so simple!

More later – I have company coming!

Opening Office 2007 Files and Open Office files

7-large.jpgWe have no computers running Vista at school, but a few students have it on home computers. I learned I can open documents created on Vista machines with Pages on my Mac.

Just yesterday I downloaded the latest OpenOffice and burned it to a cd for a student to install on their home computer. The student created a presentation and brought it to school on her jump drive. It wouldn’t open with PowerPoint on a PC or Mac and I finally had to just open it in OpenOffice on my Mac and let the teacher view and grade it on my machine. I’m not sure it was because it was a new version of OpenOffice or if it was because the student had not saved it as a PowerPoint when she created it. I will download and install it on my PC to check it out.

It is always a challenge to deal with the issues that crop up as the public sometimes moves on to new technology before the school can completely catch up. Newer printers can only be hooked to the computer via usb and older computers like Windows 98 machines may have usb ports but they don’t seem to be able to use them. Unfortunately, printers tend to give out before computers do so this is getting to be more of an issue.

I also read a “just for fun” tip on A New Mac Tip Everyday. This is how to change your login screen background. If you are like me you don’t see that screen too often but you might want to put a picture as a background even there. Here is how:

1. Make a copy of the background you want and rename it to “DefaultDesktop.jpg”.

2. Go to /System/Library/CoreServices and find the file DefaultDesktop.jpg.
3. Store the file somewhere on your hard drive in case you want to go back to the original default background.
4. Place your new background called “DefaultDesktop.jpg” in the folder /System/Library/CoreServices.
This won’t actually affect your productivity but then if you use a Mac to work you are already productive!

Wikimapia – Let’s Describe The Whole World!

Wikimapia is a fun site that lets you easily annotate google maps by marking off a specific site, adding a title, some facts, and even a picture. According to their FAQ:

“WikiMapia is a Web 2.0 project to describe the whole planet Earth. It was created by Alexandre Koriakine and Evgeniy Saveliev, inspired by Google maps and Wikipedia.”

The actual process is pretty straightforward.

  • click view and choose maps, satellite, or hybrid
  • Click in the search box on the right side of the page and type the name of the place
  • You will see a list of possible matching sites – click the one that best fits your search
  • When you find a place that you want to add a description to click “add place”
  • You will see a transparent resizeable, box with squares at the corners – move it and resize it to cover your site then click save
  • This brings up a box that allows you to type in a title, a short description, choose tags, and add a Wikipedia link if one exists.
  • When you are finished click save
  • You can now click menu and if you have a photograph of the site that you would like to share click edit and choose add/manage photos
  • You can click browse and navigate to the location of your photo and click upload. You will get a message telling you if you were successful. Click on the X to exit from this menu.

Now if you hover your cursor over the site a small box appears with the title you added. If you click that box it will show your description and the photo you added!

Our tech director told us about a class project where the students were formed into groups. They had iPods with clues to lead them to geographic places, GPS to help them get there, and digital cameras to take pictures at the destination. They also had the Tunetalk piece that would allow the students to record voice as they searched for their site. I think that you could take this a step farther and have them go online and put their information on the map using Wikimapia. You might want to add a collaboration piece by working with a class in another part of the world and letting the students exchange data on their respective sites.
If you have Google Earth installed you can click on the link in the FAQ for the Wikimapia data layer and you will be able to download the file to allow you to see the Wikimapia data in Google Earth.

One Foot in the Future, One Class Stuck in the Past

I’m going to do a little complaining and the names have been omitted to protect whoever!

scenario 1: A class that entails completing paper lessons and recording audio on cassette recorders and sending them through the mail to be graded. The students must purchase said cassette recorders and blank tapes, record themselves, put the cassettes in envelopes and then postage has to be paid to send them to the appropriate person who must then put the tape in another cassette player and listen to grade the student. Several processes, several costs, and quite a bit of time is entailed here.
scenario 2: Student records audio on a Mac using GarageBand, sends it to iTunes, exports it as an mp3 file and I upload it to a webpage where the appropriate person needs to do nothing but click to listen. Or the student can record on a PC using Audacity and saves as an mp3. No extra cost, no extra procedure comments could be added immediately with each assignment.

The world may be flat but some colleges prefer scenario 1.

We are trying to bring our teachers and students into an age of literacy at the high school level but how frustrated will they be when they get to college and find out that those skills won’t be put to use? Probably as frustrated as I am right now.

Support Net Neutrality

The very fact that I can publish on this blog makes me a supporter of Net Neutrality. I am going to make an intentional effort to learn more and be more vocal about this issue because to me the internet is the last place people have where freedom of speech truly exists. We read newspapers, listen to radio stations, and watch news shows on TV stations that are all controlled for the most part, by large media companies and so we see, hear, and read, what they want to put out there.

While there are issues in education dealing with kids safety online, validation and quality of information, copyright issues and more, I would rather we work to teach our students how to deal with those issues than open up my browser and find nothing but what my provider decides is appropriate or newsworthy.

I want to be able to choose for myself, and even if no one ever reads what I write, I want to be able to publish it. I want those same things for my kids. If you are interested in learning more about Net Neutrality there is a video you can watch that will give you some food for thought. It’s a little long so get a cup of coffee and have a notepad handy in case you want to jot something down.


Save the Internet | Rock the Vote

Second Life

I ventured into Second Life for the first time tonight. It was interesting to find out how inept I am – they may ban me from driving altogether there, I was that bad. I spent about two hours and still haven’t managed to get past the part where you are learning and must perform several tasks to get your passport to the main world.

My observations so far:

  • There seem to be way more men than women in Second Life
  • Men hit on you as though you really are the character (trust me – I DON”T look my character LOL)
  • People seem just as confused and socially inept in a virtual world as they are in the real world
  • Playing on a MacBook without the mouse attached may be a little different – control-click never seemed to produce a right-click result (Command Click works!)
  • F1 does not seem to summon help in a Mac
  • At this point I can’t imagine why anyone would actually spend money here

It’s pretty and I will give it some more time. My daughter also created a character and I am hoping to meet up with her there. I think that would be kind of interesting. I have heard of conference-like events being held there and would be interested in participating if I can ever get past the beginning. If anyone has any helpful hints I’m all ears!

Added March 03, 2007

Since I posted this Vickie Davis has written a post that contains a lot of great information on Second Life and how it is being used in education as well as reasons why it may not be ready for education.  There are links to blogs of folks who are using it and videos, and other resources.  The post is not only about Second Life but about  Virtual Worlds and the future of the web with 3D. Mrs. Davis even mentions something I have been concerned about – the actual real world money that is spent in Second Life and what happens to it.  There are ways that you can be banned from Second Life but like the real world there are definite places that I would avoid because of the “adult” content.

Before jumping off the fence on Second Life I would spend a little time researching and  Vickie’s article is a great place to start.  Another resource mentioned in this same article is a blogging college English teacher who also has a great videocast on primary and secondary research ethics and a blog dedicated to Second life.

Holiday Season Starts and Learning GIMP

I managed to do some Christmas shopping this weekend. The stores were crowded, too warm, and made me remember why I wish I would get an earlier start on my shopping. We went to the Christmas parade and watched the high school bands and Santa. My daughter played in one of the bands and we picked her and her friend up afterwards and took them to ring bells for the Salvation Army. Kinsey was at a debate meet and brought home two medals. I am proud of him and I am so glad that he had the opportunity to do something he enjoys and excels at and got recognition for it. Everyone needs that from time to time. The tree is up and I made a pot full of homemade soup. All in all a nice peaceful weekend. No great excitement but there is something to say for a chance to refuel every now and then.

I ran across some tutorials for GIMP which I have been trying hard to love. I have a lot of experience with PaintShop Pro and found it difficult to make the switch. I found some tutorials that walked you through the creation of a graphic step-by-step. I learn best by doing so those are my preferred kind of tutorial. I have a long way to go before I reach the level of proficiency I need for web graphics but at least I made some progress. The graphic wasn’t anything useful – just a cloth textured background and a circle that appears glassy and raised. Still it allowed me to get familiar with a few tools and it wasn’t totally ugly.

If I hadn’t had the time to refuel I wouldn’t have gotten focused enough to find the appropriate tutorial and complete it. Completing the tutorial gave me some confidence and a little excitement which will motivate me to learn more. GIMP seems to be a powerful piece of software but it lacks the community that has existed in the past for PaintShop Pro. There were groups and literally hundreds of tutorials and plenty of folks willing to share their expertise. There was something for every level from complete beginner to expert. I would like to see more of that sort of thing with GIMP. There is a community of Open Source users but they seem to be limited to people who are fairly comfortable with computers and who have that need to learn new software and the time to do it. I have seen a few books on using GIMP but walk in to any bookstore that carries computer books and you will usually find several choices for PaintShop Pro and PhotoShop and often several for different versions.

What makes one software package attract writers and usergroups while another that is just as good and often cheaper (in the case of GIMP free!) remains in the shadows by comparison? It took me a long time to get started and I know partly because I don’t like change. I wanted GIMP to act like PaintShop Pro and everytime I sat down to work with it I would end up frustrated. It wasn’t the software’s fault – it was my inability a adjust to the difference. What changed was that I found instructions that struck a familiar chord and provided a kind of “rosetta stone” that helped unlock my mental block.

In learning about GIMP I also learned something about my own learning style. Maybe when I understand GIMP a little better I can put that piece of information to good use and create some tutorials of my own.