Category Archives: Mac

When Is Taking Out the Trash..Not Taking Out the Trash (Mac)

If you have used a mac for awhile, and if you are virtual hoarder like I am, you will find that even though you have deleted files you still have a very bloated hard drive. There is a reason for this. Macs let you recover deleted files in case you change your mind. In order to do that it has to continue to store them, even though they may not be visible. This adds up over time.

To really truly irrevocably delete the files, go to applications, select utilities, then disk utility. Your drives will be listed on the left (even flash drives if you want)

Click the drive you want to clean up then click erase.

Don’t freak out – this will not erase everything.

Click erase free space.

Choose zero out deleted files. You can choose the others but if you have never done it before it will take a long, long, loooonnnggg time….


Beginning To Use iPhoto

To import pictures from your camera – open iPhoto.  Plug your camera in using the usb cable or using a card reader – plug your memory card in.
Open iPhoto, click file < Import pictures

Your pictures will all be in the iPhoto library – all your pictures.  One way I have seen this described is that iPhoto is a database of all your pictures.

iphotolibrary

Let’s look at Events and Albums.

Every time you import a picture from your camera or through drag and drop, iPhoto creates an event.  It’s iPhoto’s way of automatically organizing your photos according to the date they are added.  So an Event in iPhoto is just an instance of adding photos, whether it is one photo or fifty.

Albums are YOUR way of organizing your photos according to ways that make sense to you.

A photo can only be in one event because it can only be uploaded one time.

A photo can be in as many albums as you want because it doesn’t really physically move the photo – it just is a way of saying that you want to view all photos that fit this criteria you have set.

Lets use Christmas as an example.  Maybe you have taken pictures for ten years at christmas.  You have ten Christmas picture events because each Christmas you took pictures and each time you took those pictures you uploaded them to iPhoto,

Now at the end of those ten years, you want to see just the pictures of little Susie at Christmas so you can see how she has grown.

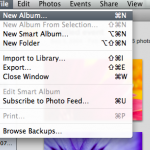
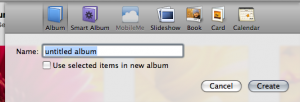
You create an album called Christmas Susie.  To create that album you just click File < New Album and give it a name. You will now see it in the list of folders on the left sidebar.

Now all you have to do is click on Library < Photos and drag the photos you want to see when you click that album and drag them in it.  You haven’t actually moved any photos.  You can still click on Library < Photos and see all of them.  But if you click on the album you will ONLY see the pictures you added to it.

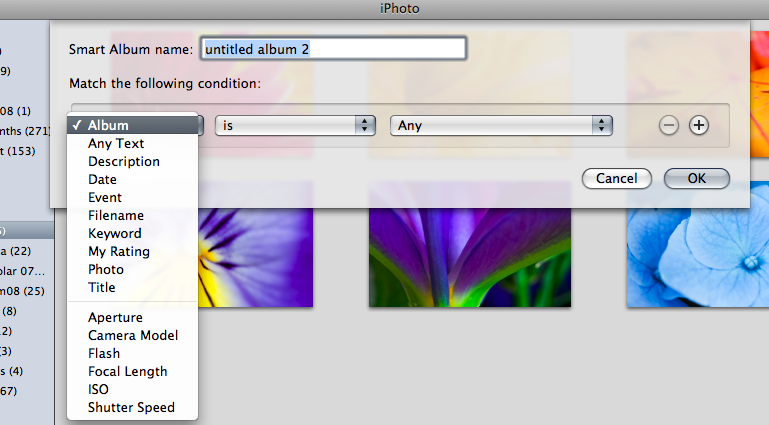
If you want to make iPhoto actually work FOR you, you can create something called a “smart” album.  Just like creating an album you go to file < new album.  This time, choose smart album (give it a name) and a new box will pop up letting you choose criteria for what goes into the album.  If you want to specify more, just click the plus sign and you will get another box to add more criteria. From now on, any picture that fits that criteria will automatically be placed into that album for you by iPhoto.

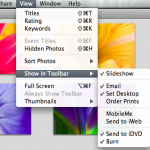
You can customize your bottom toolbar a bit to fit your needs.  To do this, click view up at the top and select “show in toolbar”.  Whatever you check will show.  You can change this at any time.

Now if you want to create a cd of some photos you can select the album you have created and click burn in the bottom toolbar making sure there is a cd in the drive.

I hope this helps you get started organizing your pictures with iPhoto.

Burn Audio CDs Using iTunes

Burning An Audio CD Using Your Mac

My last Mac post I talked about how I am not fond of iTunes.  That said, one thing that iTunes does nicely is burn your MP3 files to an audio CD that you can play in any CD player.

The first thing you need to do is create a Playlist. To do this either press the Command key and N or go to file and click New Playlist.  Give it a name so you will remember what it is.

Click on the Music icon under library in the sidebar to see all your music.  Put a check in the little boxes to the left of each song you want to include in your playlist.  Keep in mind that a CD will hold about 74 minutes of music.  You will see approximate times of each song to the right of the song name.  Average is about 18-19 songs, but you can add those minutes up to be sure you don’t have too many songs for your CD, then delete or add as needed.

When you have your Playlist created, select it and place a check next to each song if they are not already checked.  Insert blank CD in the drive. Right click (control-click) on the playlist title and select Burn Playlist to Disc. A Menu box will pop up. Make sure Audio CD and Use Sound Check are selected.  The other defaults should be fine.  Sound Check will adjust the volume so that all your songs play at the same volume level.

Click Burn and wait – iTunes will beep when it is complete.  That’s all there is to it 🙂

Also posted at PHS Computer Project Lab

Controlling Your Media On Your Mac

I love using a Mac and have always found that most of the applications for it work almost intuitively.  The only application that I really can’t make myself like is iTunes.  I guess if I used an iPod I might be more motivated to work with it but as much as I have tried, it just seems too much like a lot of Microsoft apps in that it tries to take over and do things without you asking it to.

One of the things that aggravated me the most was that it would default to opening any media you double clicked on and not only does it open it – it copies it.  If you clicked on a video clip attached to an email it would end up with a copy in your downloads folder and a copy in iTunes.  That means that if you want to completely delete the file you have to delete it both places.  While not a huge deal it is still an extra irritating step, not to mention cluttering up your Mac.

I prefer to use Songbird which is an opensource media player that looks similar to iTunes but I usually just open audio files in VLC Player and video in Quicktime.

Today I learned that it needn’t be so! I am no longer a slave to iTunes! This may be obvious to more experienced Mac users but it’s one of those little things I didn’t know I needed to look for.

The first time you open a media file (you will need to do this for each kind – mp3, avi, whatever kind you want to open with another application instead of iTunes) – right click on the file and click get info. In the Open With section you can click the side arrows and see a list of the applications you can choose to set as default.  I use QuickTime Player for most things and then I sort files into folders the way I want to see them.  I can then have SongBird import what folders I want – you can do the same with iTunes if that is your preferred media player.

If you want to find your iTunes folders after reading this it is typically in Macintosh HD/Users/YouUserName/Music/iTunes
Your download folder is typically Macintosh HD/Users/YourUserName/Downloads

Now that you know where these things live and how to tell them where to live you can clean up your files and take control of your media.

This is also posted at PHS Computer Project Lab.  Hope you found it helpful!

Comp Day May 2008

Here is my handout. Some of it is covered in other places in this blog. It was created on a Mac using Pages. I am trying to get more comfortable using the iWork software and I think that while it is not as much of a workhorse as Word it was fun and easy to export as a PDF.
Jumpdrive

Create a folder

PowerPoint Backgrounds and creating content in Word

Adding Sound to PowerPoint and making the music play across multiple slides

Creating Screenshots

Creating a group in Outlook Express

Locking your computer

Word Tips

FireFox

End of year grade export

mayStaffDevTips.pdf

Ten Steps For Burning A CD or DVD On Your Mac

  1. Create a “Burn Folder”
  2. Click the finder icon (the little blue faces) in the dock
  3. Click file/new burn folder (menu bar at the top of your screen)
  4. Go to the folder where the files you want to burn are living
  5. Click a file you want to burn to disc. (Hold down the apple key and click multiple files to select more than one)
  6. Select edit/copy and then click on the burn folder and click edit paste or drag the files over to the burn folder
  7. The files you selected should appear in the folder as “alias icons” with little arrows in the bottom left corner of each file (indicates it’s a shortcut)
  8. Select file/Burn “burn folder” to disc or click the burn button that appears in the upper right corner of the finder window
  9. There will be a dialog box asking you to insert a blank disk
  10. Insert a blank disk into the Mac and it will start burning your files.

Sharing Some More Resources For New Mac Users

How to install software

How to Uninstall Software

The main site is a blog called Mac Kindergarten and there are a lot of great tips there.

An article that tells you basically what Pages in iWork is and is not can be found on Obvious Diversion and it might be a good idea to read this before you dive in and play with the program. A comment that I would add is that while the article talks about Pages just as a word processor it functions very similar to Microsoft Publisher in that you open a template and you can keep it exactly the same and just replace placeholder text with your content or you can move everything around, completely remove some parts and pretty much re-invent the pretty wheel to suit your own needs.

TeacherTube video tutorial for KeyNote

There are quite a few video tutorials on TeacherTube for Macs. I recommend going to the searchbox on the website and just search for a program you want to learn about. This is a great way to get introduced to the software before you dive in and play.

Just A Few “Little” Mac Tricks

While there are jobs that need a full fledged word processor, there are multiple times during the day when I just need a place to put some text. I don’t want columns or hanging indents or layer upon layer of formatting. I just want to type some words! One of the applications that you will find hiding in your application folder is called TextEdit. Open it and then right-click on the icon in the dock and choose keep in dock. Aside from the fact that it is just a nifty little word processor there is another little trick you can do with it.
textediticon.jpg
This is one of those tiny little Mac things that is not hugely important but it just makes you smile. If you frequently run across snippets of text on the web that you want to save or email someone the Mac has a few ways to make this easy. Just select the text. If you are using Mail.app, you can drag the text onto the icon in the dock and it will open up a message with the text in it – all you have to do is add the addressee and click send.

If you have the TextEdit icon in the dock, you can drag the selected text onto the icon and TextEdit will open with the text already inserted. Now if it a large amount of text and you want a summary there is one more trick. Highlight the text in TextEdit and click on TextEdit in the upper left corner of your screen. Click on services and you will see a list of things that you can do. this list changes depending on what application you are in and what software is installed on your Mac. Right now we are going to choose Summarize. You can choose summarize by sentence or paragraph and you can adjust the size. When you click to close you will have the option to save or discard. Go on – give it a try. These are some of my favorite tips!

Some Mac Nuts And Bolts

If you are new to the Mac you will see that a lot of your programs have icons in the “dock” – that area at the bottom of your screen with all the cool pictures! You can click on those icons to launch programs

machdicon.jpg

You can launch programs from the dock but not everything is there. You can also click on the icon in the upper right hand corner of your screen called “Macintosh HD”.

You will now see several folders listed and you will click on the Applications folder to open it – there are your programs!applications.jpg
Another way to find your programs is to use the finder
The finder also brings up several folders and you can click on the applications folder from here. The Finder could be compared to Windows Explorer.

finder.jpg

If you find a program you want to install it is usually as easy as downloading the file and then double

clicking. Let’s use Firefox for an example –

firefoxlink.jpg

When you install software on a PC you usually use a setup file that has the extension .exe – on a mac you usually download a dmg file.

You click on the dmg file and you may have a file that looks similar to the image on the right – it’s called a disk image.  After you drag the app file to your applications folder you will ctrl click on this disk image and “eject” it.

dmgimageeg.jpg

In the case of Firefox you will download the dmg file and on the same page you will have great instructions for what to do next. The screenshots below are what you will find on the Firefox page.

firefox12.jpg

firefox34.jpg

Basically you click on the dmg file. You then drag firefox.app file into the applications folder and you are done. When you double click it the Firefox icon it will open and the icon will show in the dock. If you use it all the time you can right-click or command-click and choose leave in dock. It will now stay in the dock even when you close it.

You can also right-click icons in the dock and choose remove from dock. This does not remove the actual application – it is still in the applications folder. You just don’t have the icon sitting in the dock anymore. You can do this with programs you rarely use to clean things us a bit.

Soooo – the Macintosh HD icon is what you click to find the main folders, including the Applications folder where your programs live. If you want to install software you will download a dmg file (sometimes it may be a zip file) that you click to open. Drag the app file to the Applications folder and you have installed your first program on your Mac!

Make Screenshots With Your Mac

Do you want the whole screen?
Command-Shift-3: Take a screenshot of the screen, and save it as a file on the desktop

Do you want just the window you are working in?
Command-Shift-4, then space, then click a window: Take a screenshot of a window and save it as a file on the desktop

Do you want to select a particular part of the screen?
Command-shift-4  (your cursor will become a cross you can drag across and down to select the area to make a screenshot)

Now if you want to take the screenshot and just save it to the clipboard you will do the same thing only add ctrl.  For example: Command-Control-Shift-3
The same with the others – just hold down ctrl too.  Why would you want to do this?  Instead of having this picture sitting on your desktop you might want to open your email and paste it there and send it to me to show me a problem you are having.  You might want to paste the picture into a document or a presentation to show a step in a process you are teaching.

If you just got your Mac, you’re operating system version is Leopard and you can also do the following:
Hold down space to lock the size of a selection and move it when the mouse moves.
Hold down shift to resize only one edge of the section
Hold down option to resize selection without the center moving.
(Because I am using Tiger I haven’t had the opportunity to try those last keystrokes out but I have used the other commands often.  If I have made an error with these last commands I hope someone will let me know!)

Switching To A Mac Part 2

safariIcon.jpgHow do I get to the internet using my Mac?

The Mac comes with it’s own internet browser called Safari. Look for the icon that looks like a compass. Things will look very similar to any other time you have gone to the internet. Whether you have used Internet Explorer or Firefox you will see the webpage, a box that contains the URL or web address, and buttons for maneuvering around. Here is a screenshot that is typical of what you will see:
safariscren

On the left you see the three little round buttons that let you close/minimize, or maximize. Just below them you will see arrows for going backwards or forwards. A button to refresh the page (looks like a circular arrow) and a plus sign which lets you add the current website to your bookmarks (favorites)

Down on the right bottom corner there is a little triangle with lines across it. You will notice that when you click the maximize button in Safari it doesn’t fill the entire screen. You can drag that triangle to make the window even larger.

If you are like me and even the bi-focals are not quite enough anymore there are a couple of key shortcuts that you will love. Command (apple) key and the plus sign makes the text on a webpage bigger. You can press the key combination several times to get things large enough to read. To go back to the normal size just press command (apple) key and the minus or dash sign. If you don’t like keyboard shortcuts you can do the same thing by going to view on the toolbar and clicking make text bigger or smaller.
There is another way to make things easier to see. First practice scrolling by using two fingers on your trackpad. You can drag two fingers towards you or away from you on the trackpad to scroll. If you do this (or use your mouse scroll wheel) while holding down ctrl you will be able to zoom in to particular areas of the screen. Just move the wheel or scroll with two fingers, away from you.
To go back to normal just scroll towards you.

This zooming technique works on everything – not just Safari.

As in everything on the Mac – you can always click help on the toolbar and find answers to your questions there.

There is a box to the right of the URL where you can type words to search for.

If you decide Safari is not your cup of tea you can install Firefox for the Mac. Next time I will talk about how to install an application so you can do just that!

I will be posting on using the Mac for the next few weeks and if you have a question I will be glad to try to find answers for you.

Switching from PC to Mac – Here Are Some Starting Out Hints

1. How do I copy and paste?Apple or Command key (cmd)
this key does a lot of what the control key did on the pc and more
to copy and paste you can use this key with c for copy and v for paste

2. How do I right-click?

The ctrl click is the same as right-click on the pc

3. How do I log off or shut down?

Look in the upper left corner of your screen. Click on the picture of an apple. This menu lets you log off or shut down among other things.

4. What if a program freezes?

you would ctrl-alt-del
On the Mac press Cmd-Alt-Escape

5. How do I close an application or minimize it?

A lot of what was on the right on a pc is on the left on a mac. You will see three buttons on the left top of the application window. From left to right – close, minimize, maximize
You can also you the keys cmd and M to minimize

6. How do I backspace?

pc backspace = mac delete
If you wish to delete left to right like the windows delete key you have to press fn and delete

7. How do I know a program has been shut down?

In Windows, if you are working on a Word document and you close it, then Word is closed too. On the Mac you may close a document, but if you look at the icon in the dock (that’s that strip of programs at the bottom of your screen) you will see a little black triangle under the open programs. If you were working on a document in Pages and closed to document, you will still need to ctrl click on the icon and close the application.

*sorry – The little black triangles are what you see if you have Tiger, if you have Leopard you may have what looks like a little light under the application.

8. Where are all my applications?

If you click on that icon that looks like a hard drive on your desktop, you will see a folder called applications. That is where all your programs are.

More to come later!

Another Journaling Application

I will be the first to admit that while I am great at trying new things, I am not great at following through. I have the best intentions but this and that happen and next thing I know, I have forgotten that shiny new goal.

This school year I was determined to be more organized and I think I have improved some but there is definitely room for more. I have tried several applications this year as I tried to get in the spirit of GTD and most of them just seem more complicated than I need for what I do.

I am trying a new one starting today. It is free and simple and I’m loving that. It is called Tagebuch. It is from MyOwnApp and is a very plain diary program. You add a new entry and it adds the date and time so you can do multiple entries in a day. You can tag your entries and search them. There are a few formatting choices and you can export your notes as a PDF but for the most part it just gets out of the way and lets you write notes. So far the only feature I would like to see is a way to see a list of tags I create but I can live without it.

I will be giving it a workout this next month because I plan to use it at the hospital. I have learned to take notes on everything that happens and while I like online apps, I know I won’t always have access. This will give me a way to take notes while it keeps track of the date and time for me.

As you can see the interface is very clean and basic – write a new entry, delete an entry, tag an entry, and search for an entry.

tagebuch.jpg

I think I already love this.

Opening Office 2007 Files and Open Office files

7-large.jpg
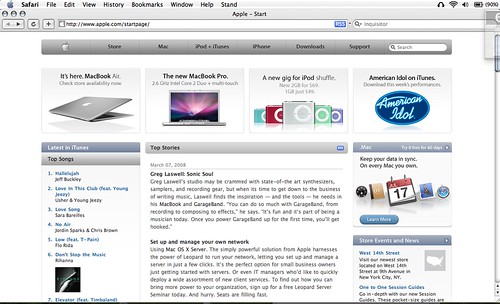
We have no computers running Vista at school, but a few students have it on home computers. I learned I can open documents created on Vista machines with Pages on my Mac.

Just yesterday I downloaded the latest OpenOffice and burned it to a cd for a student to install on their home computer. The student created a presentation and brought it to school on her jump drive. It wouldn’t open with PowerPoint on a PC or Mac and I finally had to just open it in OpenOffice on my Mac and let the teacher view and grade it on my machine. I’m not sure it was because it was a new version of OpenOffice or if it was because the student had not saved it as a PowerPoint when she created it. I will download and install it on my PC to check it out.

It is always a challenge to deal with the issues that crop up as the public sometimes moves on to new technology before the school can completely catch up. Newer printers can only be hooked to the computer via usb and older computers like Windows 98 machines may have usb ports but they don’t seem to be able to use them. Unfortunately, printers tend to give out before computers do so this is getting to be more of an issue.

I also read a “just for fun” tip on A New Mac Tip Everyday. This is how to change your login screen background. If you are like me you don’t see that screen too often but you might want to put a picture as a background even there. Here is how:

1. Make a copy of the background you want and rename it to “DefaultDesktop.jpg”.

2. Go to /System/Library/CoreServices and find the file DefaultDesktop.jpg.
3. Store the file somewhere on your hard drive in case you want to go back to the original default background.
4. Place your new background called “DefaultDesktop.jpg” in the folder /System/Library/CoreServices.
This won’t actually affect your productivity but then if you use a Mac to work you are already productive!

Microsoft Word Column Limits

A class was trying to do a project today and the idea was to use Word in three column format to create a magazine style article. The problem was that they needed to be able to insert a picture and the teacher wanted that picture to be able to span several columns and have the text wrap around it but still stay in column format. Microsoft Office 2000 and 2003 were being used. I tried to figure out a way to make it work and created a text box to use as the container for the picture. On my MacBook it worked like a charm. Unfortunately the text wrapping part didn’t work so well when I tried it on the PC.
Microsoft Word worked better on my MacBook than on the PC? That is just weird.

bwbabybars.jpg

Summer Is Here

It has rained nearly every day and everything is the yard is green and thriving! I have started on the summer catch-up around the house and have a ton still to do! I made a dent in it today and I will keep at it – like everything else I am behind because last summer was all about taking care of Dale. We got the word today – he has the green light for transplant as far as his health is concerned – now we just need a donor.

My friend B.J. is on a road trip and has promised to blog it. He has already uploaded some photos to Flickr as you can see here.

CadillacRanchBumgarner.jpgHe is in Tucumcari and has already published an entry on http://homer4k.blogspot.com/ I’m looking forward to taking the trip without ever leaving home! He did say that gas ranged from 2.97 up through 3.31 a gallon. Sounds like you need a bank loan to take a vacation anymore!

I shared a link with him for Comic Life which is an application that comes on the MacBook but now is out in beta version for the PC. That means there will be some bugs but when they get them ironed out it will be great. This is a fun application that easily lets you make comic strip like documents using pictures and then adding speech bubbles. It comes with preloaded templates – you just choose one and drag the photos to where you want them. Choose the shape of speech bubble and type in your text and you’re done. Today on Bionic Teaching I read about a class that is using this application to create ads for Greek gods and goddesses selling products. There are also some great creations there on copyright licensed under creative commons.

In 2006 Jeff Han gave a demonstration at TED Talks on an interface-free touch screen -and last night Microsoft announced the Microsoft Surface Computer which you can see here. I would love to play with one of these. Instead of spending hours learning an interface just start moving things around any way you like with your fingers. They also show loading things like pictures and maps onto someones phone from the surface. It won’t be on the market til winter 2007 but it will be making it’s appearance at different conferences and events. You can check back on their site to see where it will be shown next. It will be exciting to see how this evolves and if it makes it into the mainstream market. Imagine being able to do desktop publishing by simply dragging your documents and images around on a template and seeing the text flow to fit. Don’t like it? Just drag it somewhere else. Add voice recognition and we really will be using something that like what we only used to see in science fiction movies. The uses just boggle the mind. I’m sure it won’t be making an appearance in Paris Texas anytime soon but maybe next year at TCEA! You can read more about it here.

Weekend Tips and Links

Vicki Davis has a new look to her blog and a new video site – Teachertube! There isn’t a lot there yet but a few good things can be found so I will keep checking. Here is a video tutorial for creating a poster using Excel.

Excel Poster Video
I tried to embed it even though WordPress was not on the list of sites it stated it works on but no luck. Hopefully they will get it working soon.

Google has a new option out for Picasa for Mac users – Picasa Web Albums. You can upload from your computer or export directly from iPhoto. You get 1GB storage and you can designate whether the albums are public or private.

I learned another tip for Macs tonight. Veteran Mac users may already know this but I’m still relatively new to macs and still find some great surprises! I do a lot of cutting and pasting, sending or saving bits and pieces of web stuff and now I can highlight some text and drag it to Mail App and it will open with the text already in the body of the message ready for me to add an address and click send.

This also works for TextEdit, Stickies, and you can even drag the text onto the Safari icon in the dock and Safari will open with the google search results.

Help Site Done Right!

I spend a lot of time looking for answers to computer questions on the internet and I usually find what I’m looking for but help websites are not usually fun. Technology Ninja is a great resource with a definite coolness factor. It is only for Macs and I will be spending some time looking around there. I wish there were similar sites for Windows and Linux.

The site has a very dramatic color scheme and a very cute Ninja character that oversees the question and answer format. You can access the archives through the category list on the sidebar or use the searchbox to search by keyword.

It looks like students ask most of the questions and I can see how this would be valuable in a one-to-one computer situation.

The site is actually a blog so you can subscribe and read the latest questions and answers in your feed reader but it is worth it just to go look around on the website.