Category Archives: Application

Ten Ways To Use Twitter

I do not use the Foursquare app so I do not check in and let everyone know where I am. For one thing, it would be boring.  The majority of my location tweets would read:  “Home reading or writing on my laptop”  repeatedly, well…obviously not much fun to read.  I don’t tweet a lot period.  My blog is set up so that a tweet appears when I post something new so if you lead as boring a lifestyle as I do, you can “follow” me and be alerted whenever there is a now post.

I use Twitter more as a headline perusal source.  Just this morning I found two new books I want to read,three articles on writing that I have bookmarked to read later today,  and a couple of writing prompts to help get the juices flowing for a new poem or story,  I also found a link to a Google docs template for creating a faux Facebook page for a famous person in history.  What a great way to use Facebook in education. Choose a literary character for English.  Insert a picture of your person, list four people they would have “friended”, make up two Facebook groups they would have joined.  Make up some wall posts they would have made.

My favorite session at TCEA was Four:Forty:140: Four Themes, Forty Ideas, 140 Characters with David Jakes and the biggest takeaway from the session has been rattling around in my brain (More on this later) – don’t let the tools drive education – ask your teachers what kinds of learning experiences they want their students to have and find the tools that will best serve that purpose.  I am a person who loves new and shiny, but this resonated with me and I will be looking at technology through that lens in the future.  Using Twitter and Facebook in education are examples of teacher-thinking and technology.  We forget that technology in education SHOULD exist to support the teacher – not the other way around.  I got off topic here, I know.  Twitter however, fits into my thinking.  It is a way to discover and to listen.  How often have you attended a staff development session where the predominant conversations were negative.  “Why do we have to do this?  I could be using this time to work on grades or lesson plans.  I don’t have time to fit this technology into my lesson.”

What if we could leverage the small bites that twitter puts out and do mini staff development by adding links, videos, short tips, news about what others are doing and how it is working?

Here are some reasons to use twitter.

1. Twitter is searchable.  Like any other search engine, you need to know what you are searching for and how to drill down to get it to tell you specifically what you are looking for.

2. Twitter is customizable – through the use of hashtags (#) you can either search for tweets that  involve a current subject or post a tweet that you wish to be included in a current subject to be found by others.  There is a decent article gives you a beginning understanding of the use of hashtags here

3. Twitter is fast.  Get in – get out.  Don’t have time to read long blog articles?  You can go down your twitter feed list and read quick blurbs and discover articles to read later, recommended by people you choose to follow. Twitter posts are limited to 140 characters and as you type, you will see a count.  When you pass the 140 count, it will show as a negative number.  Links can be shortened by going to websites like TinyUrl and then added without using your entire character limit. Just copy the URL of the link you wish to share.  go to TinyUrl and paste it into the long URL box.  Click Make TinyURL and copy the resulting short link to add to your post.  At a dinner one evening at TCEA a teacher was talking about elementary students coming to the computer lab and their teacher sending a link she wanted them to use.  Getting that long URL typed in correctly took up a large chunk or their lab time.  She is planning on utilizing TinyURL to help students get to preferred links faster and more easily. Simple solution to a problem that I might not have thought about had it not been for this random snippet of conversation. (Like a Tweet, only in the real world)

4. Twitter can be sent to your phone.  You can choose to have specific feeds sent to your phone.  I subscribe to a Twitter feed that comes from our media person at school so I get the results of sports events and emergency notifications.  Helpful for times when I am not online. The user determines which tweets they follow are sent to their phone and you can always choose to stop that piece so you are not locked in to having thousands of texts beeping at you every few seconds.

5. Twitter can be timely – you can search hast-tags and follow twitters temporarily that are specific to a current even or interest.  When you are no longer interested you can Choose to “unfollow” This morning as I scanned through my Twitter feed I found all kinds of tweets about TCEA and was able to get a hint of some of what I missed.  You can’t go to everything but you can hear about it later. (and before – I now wish I had been following a little closer before and during the conference.

6. Twitter gives you the power.  Like everything else on the web, there is spam.  You can get alerts when someone chooses to follow you and you can block and/or report spam.  I have had a few of these but it has not been a huge issue.  I think twitter followers are quick to deal with those folks.

7. Twitter is communal.  As you navigate the Twitter ocean, you join discussions and become part of a community that allows you to skim the surface or become more deeply involved according to your interests.  On your sidebar you will see a list of Twitter trends and suggestions of “Who to Follow”  You can pop in and “eavesdrop” on the conversations or you can participate by clicking “favorite” which will save it as a favorite post.  You can “Retweet” which passes on something you find interesting to people who are following you.  You can “Reply” and start a dialogue”

8. Twitter can improve your writing skills.  If you are like me and tend to be wordy – Twitter becomes an exercise in brevity.  There are some groups on twitter that post flash fiction.  Can you tell a story in 140 characters?

9. You can play games.  Here are links to a few but you can do a Google search and find more.

Twivia -  trivia questions via Twitter.  Twivia asks a question and the first person to @reply the answer gets points, specified in every Tweet. Twivia tweets the correct answers after someone gets it correct. You can even suggest questions to Twivia.

BeatMyTweet
– sends out word scrambles every hour.

10.   Twitter can keep you up on local news and weather.  More and more news sources have added share on Twitter buttons and you can “follow” to hear the latest weather alerts, traffic updates, and news headlines.

I hope you will share some ways that you have found to use Twitter.

Quick addition – I found a drag and drop “Share on Twitter” button.  Just drag the button from this web page to the bookmark bar in Firefox and you can quickly share a link to any web page, even if they don’t have a Share button of their own.  Just click the button when you are on a web page you want to share and it will create a short URl and add it as a twitter post.

Another quick addition – Great article!  15 Twitter Tips for Beginners

Using Google Earth to Drive Your Lessons to Victory Lane TCEA09 Notes

Susan Anderson and Jim Holland Arlington isd
http://googleearthlessons.wetpaint.com
www.curriculummagic.com

the students would have two kmz files and a powerpoint
there would already be some basic prerequisite skills
lesson called Lost
geographic labeling of the earth
based on reinforcing that skill
a little on time zones

an alien has landed on earth and really doesn’t know where they are but will give you as the students, clues to help discover their location

this lesson probably targets 4th or 5th grade

TEKS come from grades 2,3 and 5

technical difficulties – they are trying to get to google earth

they have folded cards with abcd and yes, no, false, true for the “student” participants to hold up to answer questions (this would be great with writeon wipe off boards too

Asking geography questions as students hold up answer cards about hemisphere and latitude, longitude

Showing Australia – this country is not A continent, B Country, C island, D isthmus
Teacher asks why this place is not

What line of longitude is opposite of the international dateline a equator, b rime meridian, c tropic of cancer, and d tropic of capricorn

when it is summer in the western hemisphere, it is winter in the eastern hemisphere true/false

In order to navigate around the earth I can grab it with the hand or double click on the earth and it will turn. zoom in, push it around with the hand, use the rotaion
can turn off automatic tilt while zooming if you like

version 5 released Sunday

to add a placemark
click on pushpin choose add placemark
give it a name and type info into description
now if you click on the placemark the info in the description will be displayed
you can change the icon from the yellow placemark
right click on placemark to edit it choose properties
add custom icons – any jpg pr gif
right click and save place as
native extension is kmz so it will be whatever name you gave it.kmz
kmz files are very small so easy to share

all about me in the handout is a great way to intro google earth

a teaching tip with google earth – have students turn their mouse upside down (it’s hard to sneak quietly

around the world are placemarks – many with question marks

eliminate placemarks that do not have alien clues
rightclick and turn off
so now only placemarks you need to see will be displayed

Lost has a list of cities in one column and the other column is for students to write why that city was eliminated

eg if a clue said it’s a place where penguins live then you might want to eliminate Mexico city

first one done together for guided practice

first slide
students will double click on the Lost kmz file which will automatically launch google earth for you

Hi my name is Nan I’m from the planet ning I think I’m lost can you help. I’ve got a few clues to help – I am not on an island

you can password protect a ppt file
save, choose where and under tools on 07 and 03 – choose general options on 07 security options makes you enter a password
his would be useful for a ppt you want students to use so they couldn’t modify it
password can be needed to open or just to modify

can go to view menu and choose grid to see the gridlines

online tools available on their wiki
online stopwatch – you can give students specific amount of time for an activity
www.online-stopwatch.com
can be embedded into a blog or wiki

ctrl mouse properties
pointer options
show location of mouse pointer when I press the control key

also on the wiki is the random name picker (or random vocab word
classtools
random name/word picker

kml files – things like timezones can be contained in kml files
you can turn on and turn off some of these overlays if you only want it on long enough to do a task
some of the overlays make it hard to see anything else.

At this point I had to move on to the next session but most of what you would need is on their wiki

Race Into Production TCEA09 Notes

Race Into Production
Jodi Andoe and Abby Rogers PISD
http://t4.jordandistirct.org/payattention
www whatever whenever wherever
teachers moving from dog and pony show to full fledged three ring circus with the teacher – not as the main act, but as the ringmaster
kids love to be center stage
ipods cameras phones
friend or foe?
combining what students have and what teachers have and making it work in the classroom
combine student interests and content for curriculum
provide students with info on available tools for multimedia
student engagement
reflection for deep learning
project based learning
effective integration of technology into instruction
differentiated instruction
centers, tiered lesson plans
advances photography and multimedia all the way down to basic ppt
works with all levels
critical thinking skills
technology TEKS
engages students
their minds wrapped around out content in a way they want to think about it
improved test scores
letting the students touch the learning
gather ideas – don’t re-invent the wheel
take tried and true projects and add a multimedia option to it
determine student needs and find their resources and skills
set timetable for completion
gather resources and hardware
what do you get when you mix CSCOPE Performance indicator’
students had a psp player, iPod, science closet, audacity, photostory movie maker and wax – made a rap video on global warming

used rubric that was in cscope and applied to multimedia project
what is the concept you want them to learn
rubric attributes
point of view
content
resources
curriculum alignment
organization
student cooperation
camera and images
titles and credits
sound
language
pacing and narrative
transitions and effects

make sure criteria is set beforehand and use the ribric
should be expressed in terms of observable product characteristics
scoring rubrics should be written in specific and clear language
statement of criteria must be fair and free from bias

green screen – green sheet from walmart taped to classroom wall
let kids teach you

audacity, wax 2.0 blender freeplaymusic photostory animoto
wax works with moviemaker and others
freeplaymusic – if burned to dvd becomes a copyright issue
animoto free 30 second video creation – can subscribe 19.00 year and get longer time and more options
handout includes cheatsheet of useful web 2.0 sites and free or opensource software

handouts will be available later on the TCEA site – I will post the link when it becomes available

Links To Visit

This is the coolest online image application I have seen.  It is called Sumo Paint and has a ton of features!  There are layers, gradients, shapes, brushes, and blend modes.  I played with it for about three minutes and made a little picture (nothing fancy, I know)

justforfun.jpg

If you are in a more serious mood and if you Twitter you might consider in taking part tonight in fact checking during the vice-presidential debate.  NPR is asking that you watch and whenever you hear something that you think contradicts what you have already heard, see if you can find a transcript or video that backs it up and the same thing when a statistic is quoted – try to find the original source.  Twitter your finding with the tag #factcheck in your tweet.
Amazing – NPR will have people all over the country doing their preliminary research for them.  To me this is the interactive internet at it’s best.   What a way to get people involved.  I wish I had seen this sooner.  It would have been fun to have a twitter/debate party!  There is still time – if you have wireless and some friends with laptops get together and participate!

Google Docs Has Templates

If you are following Google you know that several days ago a new link appeared on the top right side of the page for New Features.  Google Docs has added templates.  There are over a hundred for each application and address multiple needs.

I threw together some screenshots on a newsletter template and saved it as a PDF file for you to see, but I say just go there and play around.  You can save a template under a new name and customize it with your company logo.  You have multiple choices for how to save your new document.  At this point you have to click on the new features link to get to the templates but I am confident that the Google folks will incorporate the templates into the document tools menus soon.
GoogleDocsTemplates.pdf

Addendum – I spoke too soon (or too late LOL) If you sign in to Google Docs and click new you can now choose document, spreadsheet, presentation, folder, or FROM TEMPLATE!! Yay Google!

Getting Things Done and Organized With Google Spreadsheets and Forms

Example of a Google Docs spreadsheet PDA

  • Create a new spreadsheet
  • Create headers across the top – you can format the text and background color if you like.
  • I used Subject, Date, Notes, Details
  • At the bottom of the screen you will see a tab for the sheet you are working on..  If you click it you have several editing choices, including delete, duplicate, rename, and move right or left.  For now you might want to rename it work.
  • Now click again and duplicate it (I did this twice) You now have three sheets with the same headers and you can now click on and rename the other two sheets.  I have named my sheets Work, Home, Ideas.
  • Now here is where it gets fun
  • You could just enter information directly into the spreadsheet but with Google Docs you can create a form that will make it easier to quickly enter data and have it automatically update in the spreadsheet.
  • We will create a separate form for each sheet and show you how you can use those links to populate your spreadsheet PDA
  • Click on the tab for one of the sheets so you will have that sheet open.
  • You should see a row of light blue tabs across the top of the document – click the tab for Form
  • Click create a form
  • A new page will open with your form already created according to the column headers you used in your spreadsheet.
  • As you move your mouse cursor over each field in your form you will see that you can edit that individual field, you can move it, you can even add or delete questions.  Just remember that what you do on the form will be reflected on the spreadsheet.  If you delete a field it will no longer exist on the spreadsheet either.  A good rule of thumb is that the form is “the boss” of the spreadsheet.
  • Now choose “next choose recipients”  You can put in your own email address and if you look on the right you will see a note saying that if you have trouble viewing or submitting this form, you can fill it out online and there will be a link.  This is the link you want to save as a shortcut on your desktop.  You can change the name of the link to make it easier to find.  On a PC you will right click on the shortcut and choose rename.  If you use something like @Home the @ sign will cause it to be near the top if you arrange you icons in alphabetical order.  On a Mac you will control-click the shortcut and choose info. There will be a field where you can change the name.


This would work for a student organizer – just change the column headings to something like assignment, due date, teacher/professor, class period, notes/resources. 

A couple of modifications and you can share and collaborate so now you have an online project management system.

You can also click publish – this gives you an embeddable link and an RSS feed so you can subscribe to your own list.
Choose more publishing options and click in the drop down box and choose HTML to embed in a webpage.  You can also choose which sheets and even which cells to show.  The will generate some HTML that you can paste into your blog.  Pay attention to the sizes shown in the HTML.  If you paste it and find it is bigger than the space provided in the webpage you can usually adjust those numbers to make it fit.

I hope this is useful to you!

I have only included a form that adds information to one sheet.

Addendum: I cannot get the embedded form to work.  I can use the form I created from my desktop or via my email so for the time being look at the above images as screenshots and don’t be afraid to follow the steps to create one to play with yourself.

Sifting Your RSS Feeds

I am subscribed to so many more rss feeds that I have time to read and often I will subscribe to a blog written by someone with multiple interests because they occasionally write about something I am interested in.  This means that I will see a lot of article titles that are not what I want to read.  I discovered a new tool today that will help me shrink some of that reader “bloat”

It is called Feedsifter and can be found here

You just put in the URL of the site and then type in the keywords you are interested in and Feedsifter creates a second feed that you can subscribe to.  Now you have a feed tailored to your interest!

If you have a google account the easiest thing in the world is to sign in.  Go to igoogle and click add stuff .  Looking down on the left sidebar you will find a choice for entering a url – paste the feed URL that feedsifter created there and you will now have this feed show up directly on your igoogle homepage.

I have often used del.icio.us to create a feed of bookmarks on a specific subject.  Today I created one for googledocs and using Feedsifter I had it make a new feed that would show me only googledoc bookmarks that contain spreadsheet and/or form.  Now I have an area that helps me keep up with new blog posts on Google spreadsheets. This won’t be a perfect solution but it helps me narrow down some of what shows up in my reader now.

This tip came from The Simple Dollar – thanks for a great hint!

Google Docs Spreadsheet With Embedded Map

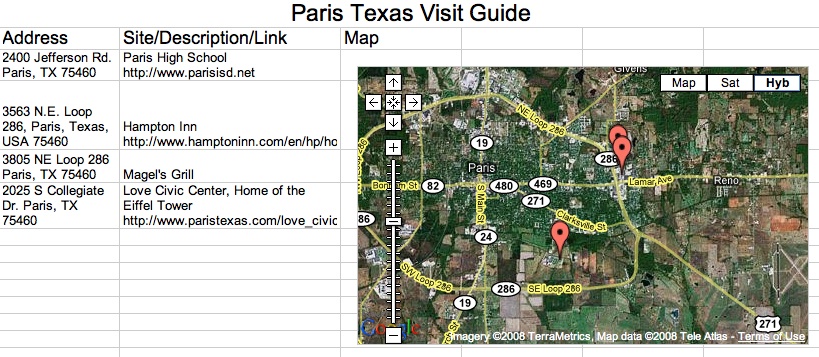
Let’s make a quick guide for someone planning to visit Paris. There is more that could be included but this will be enough to get you started! The instructions came from the Google Docs Blog which is a wonderful resource!

First, determine the sites you will use and open a Google docs spreadsheet

In the first column put the addresses

In the second column put the names and a short description (you can include a link)

Click and drag to highlight both columns

Click Insert on the toolbar and choose gadget

Select Google Maps

You can add a title but you now have a list of sites with their addresses and links and a map to boot! Cool and simple.

Save it, click publish and check the box – republish changes and you can continue to add to it and you can email a link to it to your friends and family!

Here is a link to mine:

http://spreadsheets.google.com/pub?key=pgVdUefx1CH0V_U5tumJrHw

Here is a screenshot:

googdocmap.jpg

Comp Day May 2008

Here is my handout. Some of it is covered in other places in this blog. It was created on a Mac using Pages. I am trying to get more comfortable using the iWork software and I think that while it is not as much of a workhorse as Word it was fun and easy to export as a PDF.
Jumpdrive

Create a folder

PowerPoint Backgrounds and creating content in Word

Adding Sound to PowerPoint and making the music play across multiple slides

Creating Screenshots

Creating a group in Outlook Express

Locking your computer

Word Tips

FireFox

End of year grade export

mayStaffDevTips.pdf

PowerPoint Tip – Create Your Content In Word

You can type the content for your PowerPoint presentation in Microsoft Word. If you highlight a section and choose Heading 1 in the formatting toolbar, that section of text can become a slide title. If you highlight another section and choose Heading 2 in the formatting toolbar, that text will become a bullet point. Header 3 will give you a bullet one level in. Normal text will not show up at all.

head12.jpg

When you are finished typing your information, save your text in case you wish to edit or re-use later. Go to File/Send to (click the chevron arrows if necessary to see all the choices) and choose Microsoft PowerPoint.

filesendtoppt.jpg

You now have a basic presentation with all your text already in place. You can now add backgrounds, animations, slide transitions and whatever else you want to dress it up.

pptslide1.jpg

This technique makes it easy to see the flow of your presentation and to see where you might want to add notes if you are creating notes pages for yourself. You could type notes into Word as you work on your original text – just leave the notes as normal text. They won’t show on the presentation when you “send” it but once your Slide titles and bullets have been created in PowerPoint you can switch view to notes page and you can easily paste your notes onto the bottom section and you will have a complete presentation package complete with notes for you to use as you present.
If you’ve ever watched students work on a presentation you know that they tend to want to spend the bulk of their time working on the bling. By creating content in Word and then sending it to PowerPoint you know they are starting with the “cake” and then working on the “frosting”.

If you are ever asked to create a PowerPoint for someone else, you can tell them you would be glad to help and if they will type their information in Word and send it to you you will have it done very quickly for them.

JotSpot Has Been Relaunched As Google Sites

I will go play this evening and post about it tomorrow!

Greetings!

We’re contacting everyone who’s expressed interest in learning of
JotSpot registration re-openings on the JotSpot website. And
today, we’re excited to announce that JotSpot is working on Google
infrastructure and has been re-launched as Google Sites.

Google Sites is the latest offering from Google Apps, a suite of
products designed to improve communication and collaboration
amongst employees, students, and groups. Google Sites makes
creating a team web site as easy as editing a document. You can
quickly gather a variety of information in one place — including
videos, calendars, presentations, attachments, and gadgets — and
easily share it for viewing or editing with a small group, their
entire organization, or the world.

To get started with Google Sites, you’ll first need to sign up for
the Google Apps edition that’s right for you (if you’re not
already a Google Apps user). Start the sign-up process at:

http://sites.google.com

Sincerely,

The Google Apps Team
Google Inc.
1600 Amphitheatre Parkway
Mountain View, CA 94043

Below is an example of a classroom page created in Google sites. You can customize, use their templates, upload up to 10 mb files with 10 gb of storage. Since Google sites is integrated with other google products you can embed slideshows, video, spreadsheets and calendars into you page. One more piece of the Google World Dominance plan!
googlesiteseg.jpg

Ten Things You May Not Know About PowerPoint

  1. You can put single words in separate text boxes and animate them
  2. You can insert an autoshape and then have your text wrap within the shape
  3. You can decide if the animation should start after the preceding action or wait for you to click a mouse or presenter, or set the timing
  4. You can have more than one object animated on a slide
  5. You can add shapes and pictures and move them on top of or under other items like a stack of pictures and words by arranging/send to back or bring to front
  6. After you choose an animation you can click the effect tab and make the text change color, play a sound, appear a word or a letter at a time
  7. the effects tab will also let you group to second level paragraphs to give you more control of how bulleted lists appear (called a build)
  8. have a chart appear on the slide, one element at a time
  9. add buttons or pictures that let you navigate around your slideshow. You decide what gets clicked and where it sends you
  10. Draw comic book type illustrations using the lines in the autoshapes menu and fill shapes with gradients to give the illusion of shading

Computer Applications UIL

I started coaching for the first time this year and this is only the second meet we have competed in. I have two students and one went with me to the last meet. While she didn’t place this time she made a huge improvement from the last time. My other student got her first introduction to the real thing today and I expect she will improve as well.

It has been a learning experience for me as well. This year coaches are required to grade after the meet and I think this is a very good thing. I have learned more during the grading about how to help my students do better than any other time. Both my kids are seniors so I will start over next year, but with more knowledge and confidence. Every meet we attend I learn more and we get a copy of that test to take with us so we will build up a bank of practice material.

I am trying to work through all the tests I have that are from last year. If I can do it, I can explain it. If you are not familiar with this event, the student is given a test that may consist of a Word document, and Access database, and an Excel spreadsheet. You may have to embed a spreadsheet in a memo, or import data into a document to complete a mail merge. There will more than likely be functions involved too.

Computer Applications seems to traditionally be an early event and I was up at 5:30 this morning but we were home by noon so I am now getting ready to turn in.

It’s nice to see progress even if it isn’t a win. At least we are headed in the right direction!

PowerPoint Can Be Artistic? Poetic? Pretty???

Frame 1

Take a look at this site – a teacher wants her class to do a project like this – can we put together some instructions?

Sidebar – whoa this is cool! I am loving this.

Frame 2

A little playing, a little tweaking, some typing and some screenshots and yes we can do this! This is fun and creative and the students will take it and run!

Frame 3

Some explaining – this is how, this is where, be creative – think! not just about the bells and whistles; the bells and whistles have to enhance the symbolism in the text.
Think about the poem, put some words in separate text boxes. Animate them, use color, movement, sound and pictures to SHOW the poem!

Frame 4

Next day student asking will I be there that afternoon – this is confusing. Sure, we talk about the poem (she was stuck – how to animate a poem about sleep)

Frame 5

Student using all the elements – beautiful! Walking around helping, add a few seconds, try this and that. Go sit down – get out of the way. They are the artists!

If you are creating – you are learning. I’m learning, they are teaching me!
They are making a new piece of art!

There will be some tutorials coming up!

Three Words

This post has two purposes. I am trying out a plugin that lets me finally embed youtube videos here. I also want to share this video as a great idea for a class project. It could be themed according to any subject and filmed in pieces at different times and then put together later.

Three Words
http://www.youtube.com/watch?v=qO0jovLVPA8&feature=related

If you do a YouTube search on Three Words you will find many versions and each as some very creative and powerful segments.

thanks to Mark Ghosh for the embedify plugin that allowed me to finally embed the video!!

Developing an Exemplary Writing Program with Digital Storytelling 8740

Presenter Shaunna Buck

The best parts of this session for me were the student presentation examples. It was truly exciting to see the quality.

7th grade writing program meant to grow beyond writing well enough to pass
Develop writing portfolio
Folders for
Rough drafts
Final drafts
Favorites
Reflective place – higher order thinking

“Be yourself. Above all, let who you are, what you are, what you believe, shine through every sentence you write, every piece you finish.” John Jakes

Collections and reflections
Organizational pattern akin to true writer’s notebook
Student’s papers that received a “4” were blown up poster size, a picture sometimes added, laminated and put up on the hall wall
Student’s goal became creating a “wall worthy” paper
Slowed the traffic pattern in the hall but it was kind of hard to get on to a student who was slow moving when the reason was that they were reading.
Reaction “ so and so’s up there?? How did they get a paper up there??”
Students no longer convinced that their first draft is their best work”
Motivation through competition

Students recorded reading their papers using audacity then uploaded as podcast

Incorporated Photostory 3 video to create digital stories enhanced the program
“Photostory like PowerPoint on speed”
Easy to learn and use
Students were motivated to rewrite

“Revision no longer a dirty word”
“Public recognition key”

Public presentation skills – students who were not comfortable getting up in front of class presenting had success in a room alone recording.

Save ppt slides as jpeg and import into Photostory, add music and audio – insert
Reading students used their class novel
Project – two word sentences – subject,verb – subject verb
Great for inclusion kids

Student went to district – made people cry
Photostory presentation about mom being killed in a car wreck – not true just a story but made me cry anyway
“if you make people cry you almost always get a 4!”

Think about their writing visually

Project – study origin of their name – not just definition but what it means to them, who they are.
Beyond thinking literally

Planning
Digital camera to make their own pictures , google images, scans
discussion about copyright
template for storyboard (looks like filmstrip)
require storyboard and script

Note what images go where
Import pictures into photostory
They used the headphones with mic attached
Pairs – one to talk, the other to click buttons, then they switch places
Photostory has a lot of built in music clips
Resource : freeplaymusic.com

Suggested book “Mechanically Inclined” Jeff Anderson

Dynamic Powerpoint – Beyond Basics By Cindy Cohen 8035

This was a good session that gave some basic common sense tips on using PowerPoint.

Why would we want to use it (well)?
• This generation has little tolerance for delays or mistakes in delivery of information
• It’s an easy way to get information across in a short time period

Caution:

  • Too much information – on each slide
  • Color choices (may depend on lighting in presentation location)
  • Can be “eye catching or eye watering”
  • Presentation often not test driven to catch problems

If well used can be extremely engaging

Tips:

  • Proof read
  • Don’t include all information
  • Practice test run
  • Don’t over-use the software in the classroom

Key – Keep the focus on the presenter

Start with the basics

  • Know your information
  • What are the key points or concepts
  • Make an outline (enter basic information on blank slides)
  • Order is important
  • Add relevant materials (diagrams, images, audio, video)

Consider approaches for presenting

  • How is the slide being used?
  • Ask a question on the slide (stop for discussion)
  • Break up with a related activity (stop presentation, do short activity, go back to presentation)

Adjust style elements (easy place to waste time)

  • Visual interest is key but remember to keep focus on the presenter
  • You can use WordArt to make notes on each slide to remind you of details, changes, and additions – what needs to be done to each slide
  • Do test run
  • Prepare your oral presentation (this is the part that many people omit!)
  • To prepare you can take your original outline and print it out or print slide handouts.
  • 3 slides to a page and you can have lines on the right side for notes

Presentations without a presenter

  • Podcast presentation
  • Save each slide as a jpeg
  • Insert into MovieMaker
  • Create audio voiceover using Audacity put together audio and movie – Podcast

*They did a Distance Learning Day at Good Shepherd. They submitted lesson plans, students stayed home and did assignments via internet. This type of podcast presentation was part of her lesson.

Keeping Up with the Googlebots: What’s New at Google (Patrick Crispen) 8940

If you go to TCEA 2008 and click on Sessions and Workshops, list free sessions you will see the entire list and the session I attend will have the session number in the post as well.  You will be able to look for handouts there in a few weeks.

I like Patrick Crispen’s presenting style.  He starts on time, tells you what he will cover, moves through the presentation like an east Texas wind.  Before you know it he is saying we have to hurry because there are only three minutes left, ties is all up and sends you out as the next group comes in.  He must have an incredible amount of energy or sleep for a week after a conference like this.

His website is NetSquirrel and if you go there and click on PowerPoint Presentations on the side you will have access to all his handouts.  They are licensed under Creative Commons (he was the first person I heard even mention Creative Commons yesterday) so you are free to download his material. The presentation for this session will be udated in a few days.
Some new things I learned yesterday:

  • Google free business directory assistance 1 – 800 – 466 – 4411
    • Voice, directions, maps on your cell phone.  Google wants to do voice search – this is there start at getting voices saying words
  • Google Notebook now datestamps your entries
  • Google.com/educators has added discovery videos

This morning I found a new little snippet in my reader about Google docs – they have added a new little tool. When you share a spreadsheet you now have three choices – collaborator, viewer, and now “to fill out a form”. You can create a form in Google spreadsheets, share it with people and as they respond to the form, the data is automatically added to your spreadsheet.